skip to main |
skip to sidebar
Windows and weatherization have been in the news a lot lately with President Obama pushing a for Americans to make improvements to the energy efficiency of their homes. He's spoken a lot about replacing windows, and not so much about repairing existing single-pane windows or making small changes that will improve their efficiency. This is at odds with his other "green" initiatives, and seems to be the result of much lobbying from the replacement window industry.
There are several problems with replacement windows from a "green" perspective. Primarily because no one from the replacement window industry talks about the entire energy life-cycle of a replacement window that includes manufacturing the window, transporting it, and disposing of it when its useful life is over. Here are some "green" issues to consider:
- They are expensive - with estimates for payback periods through energy savings of between 20 and 40 years (and some even longer). And guess what...the windows won't last that long, so you'll be on your next set of replacement windows before you're done paying for the first ones! (see below)
- They cannot be repaired (maybe this is why they are called "maintenance free"!)
- Their seals will fail after about 15 years - sometimes sooner - though it's usually after the warranty has expired. Then you'll need to replace your replacement window!
- New windows require a lot of energy to manufacture, uses up natural resources (wood), and introduces toxic chemicals into the environment during the manufacture of vinyl, and again when the failed window is taken to the dump. They also have to be transported to your site - often from across the country requiring use of fossil fuels and adding to air pollution.
- Wood used in new windows is "new-growth" wood. Because it grows so quickly, it's softer and less resistant to deterioration and insect damage than old-growth wood that was used to manufacture older and historic windows.
- Old windows that are being replaced end up in landfills. Besides taking up space in the landfill, it can also introduce lead into the environment (you don't really think all those contractors are mitigating the lead paint before dumping those old windows do you?)
- The money you spend on buying replacement windows leaves your local economy (unless you live in a town where a window manufacturing plant is located and buy them from a locally-owned retailer).
From a jobs creation standpoint, fixing up your old windows is far better than replacing them. It's a more labor intensive process than installing replacements, and the jobs are entirely created in your local economy. Caulk, glazing compound, and glass is pretty cheap - so are replacement sash cords - paying someone to do the work (if you don't just do it yourself) is good for your local economy, and generally good for your own wallet!
From a historic preservation perspective, it's pretty simple...They're not your original windows - they are a substitute. And they look like a substitute! They don't match the look of your house. Windows are very important in defining the character of buildings - change the windows and you'll dramatically change the appearance of your house.
In general, a much "greener" and better alternative is to fix up your original single-pane windows. Regardless of what the replacement window manufacturers tell you, single pane windows with a storm (interior or exterior) and some judicious use of caulk can be as efficient as a new replacement window. In some cases they provide better efficiency because the insulating factor of a window comes from the air (or other gas) between two pieces of glass. Since the space between a single pane window and its storm is wider than the space between two pane of glass in a replacement window, its insulating factor is higher.
Also, if you repair your old windows so that both the top and bottom sashes are working, then in warmer months when you raise the lower sash to let cool air in, you can also lower the top sash to let warm air out. This natural ventilation system will keep your house cooler and reduce those giant electricity bills for air conditioning!
The National Trust for Historic Preservation is on top of this window issue and is working to get the Obama Administration to understand it. They have a lot of resources available online for homeowners and other historic property owners. Check our their Weatherization Guide for Older and Historic Buildings at http://www.preservationnation.org/issues/weatherization/
At our historic sites, we'll be tackling some window projects at the Amstel House after the holidays. The primary window project is the installation of interior storm windows throughout the building. These interior storms will help us with improving the energy efficiency of our historic single pane windows and limiting UV light to the interior (which damages objects over time). We'll also be doing our share of caulking as well as adding insulation to attics and cellars.
We're looking into scheduling a workshop to discuss storm windows and maybe glazing repairs sometime in January or February (stay tuned for more info about that).
...here in the 18th century?
That's the question we've been grappling with regarding a doorway between the original kitchen of the Amstel House and the second parlor - which functioned as a dining room during certain hours of the day in the 18th century. Here's a pic of the doorway (on the right) and the rest of the wall before we started our accessibility project. The original kitchen can be seen through the doorway beyond the hall:
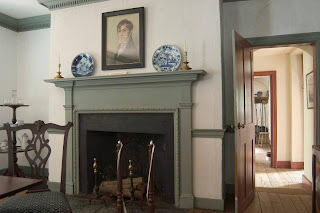
On the near side of the doorway is some c. 1970 trim. On the far side of the doorway, there is no trim - instead the top of the opening is arched and finished in plaster. It reminds me of some arched doorways I've seen in local houses built in the 1920s and 30s. In my mind, this reinforces the idea that this wasn't an original doorway opening - at least not in its current configuration.
Here's some more background...
Here's a HABS drawing of the first floor of the Amstel House as it appears today. The doorway in question is the one with a red circle around it. It's also important to know that the two current windows that have green squares around them in the floorplan were doorways in the 18th century (we're confident of that!)
 A few years ago we had an architectural historian examine the Amstel House, and he had insufficient evidence to be able to say for certain whether this doorway was original or not. If it was not original, there are pretty interesting implications for traffic flow between the kitchen and the rest of the house. Without this doorway, slaves or servants bringing food from the kitchen into the second parlor had to leave the kitchen through one green door and into the second parlor through the other green door, or go through the kitchen yard and enter the center hall through the rear door - either way, both they and the food are exposed to the elements. We offered this possibile scenario in our interpretation of the house though it has always been something that has bothered most of us here.
There are some clues in the nearby architecture that indicate that the wall that the doorway is part of was originally a paneled wall with built-in cabinets on either side of the fireplace. The clues include a break in the baseboard, change in floorboards, ghost lines in the adjacent plaster walls and ceiling, and a nagging sense that something just isn't right.
Here's some pics:
 This pic shows the break in the baseboard. This wall is to the right of the doorway in question. There's a vertical line in the plaster directly above this break too, but you can't see it well in this small photo.
Here are two old floorboards still in place near the doorway. The joint toward the bottom of the picture lines up with the break in the baseboard above (you'll have to take my word for it).

Finally, there's a ghost line (more like a plaster crack!) in the plaster ceiling that lines up with the corner of the fireplace, the lines in the wall and baseboard and the joint from old to new flooring. All this evidence seems to support the idea that there was some type of cabinet in this location. The cornice, by the way, is 20th century - installed during an early restoration effort.

Similar evidence exists on the other side of the fireplace (remember Georgian symmetry):

So with all these things nagging at us, along comes our accessibility project this year. We decide that to give people that use wheelchairs full access to the first floor, we need to widen this doorway. Actually we just need to wide the c. 1970 visible frame of the doorway (no masonry involved). As we got underway removing the frame of the doorway we were able to see more of the masonry construction of the arch - and guess what...it looks like the arch was built in as part of the original masonry! No obvious change in the brick units and no change in the mortar - the arch matches the wall nicely.
Here are a few pics of what we found:
The first pic shows the full arch masonry exposed. Then closeup shots of the left and right sides of the arch.


Next we examined the plaster. It was applied directly to the brick of the arch. It looks like the plaster had an early black painted finish on it:

Here's a shot from underneath the arch look up toward the ceiling. The black finish is pretty wide across the bottom of the arch. It may continue underneath the modern finish - we can't tell:

This black finish continues down the side of the doorway opening:

It also continues behind the current baseboard - indicating that there may not have been a baseboard in this location. Instead, the wall was painted black to mimic a baseboard. I've certainly seen this treatment in other 18th century houses (Yes, I'm looking at you, John Chad!) If this area was inside a cabinet, I think this makes a great deal of sense - particularly given the break in the baseboard noted above:
 One other thing to note is that the two old floor boards (see photo way above) extend through the current doorway. If the doorway was not there in the 18th century, and it was a wall instead, the floorboards would stop at the interior side of the wall (their ends being covered by baseboard).
So with all this new information coupled with our old, nagging clues, we have a new theory on the design of this wall. I believe that the wall was fully paneled in wood, with a built-in cabinet with shelves on the left of the fireplace and a false cabinet on the right side of the fireplace where this arched doorway is. With the door of the false cabinet closed, it would conceal the arched opening into the kitchen while allowing quick passage between the two rooms as needed. This concept of concealing doorways, stairs, and passages is certainly something that is used in other houses from this period. In fact, it is used on the second floor of the Amstel House - directly above these two rooms and above this very doorway! I like this theory better and better!
Based on this new information, here's a modified version of the HABS floorplan that I mocked up to reflect what I think the first floor of the Amstel House looked like in the 18th century:
 So is this the last word on this subject?
I doubt it. More information will probably come to light in the future...possibly through paint analysis that will help establish with more certainty what the first finishes are on the plaster in this area.
Until something else comes to light, we'll be incorporating this "conjectural" floorplan in our interpretation of the house, always being careful to use the qualifying phrase "Based on current research, we believe..."
On Saturday, October 24, from 10 am to Noon, the New Castle Community History and Archaeology Program (NCCHAP) will sponsor a workshop at the Read House on historic window repair. Workshop participants will observe the removal of historic window sashes and components such as weights and pulleys. Carpenters will discuss the repair of sashes, frames, and sills. The Read House Save America's Treasures project restoration architect will also discuss the repair of historic windows and the Read House project.
Space is limited; please call 302-322-8411 to register.
This workshop will be complemented by another workshop offered at the Amstel House focusing on the benefits of storm windows and other techniques for improving energy efficiency.
Wow! It's October already, and I haven't had a post on here since August! Time to catch everyone up one what's been happening!
Drainage
This is where we left our story in August. The masons arrived and pulled up all the bricks from our rear walkway, recorded their position, and began to did a few trenches for drainage pipes that will lead to the dry well.
Drain pipes that will gather water from two new downspouts at the rear of the building were installed. They convey the water to the drywell - an 7' deep hole in the backyard filled with 3" stone - where the water will safely disburse underground. After the pipes were laid, the trenches were backfilled with gravel and/or dirt. Along the side of the house, a membrane was used to line the trench to prevent any possible leak from impacting the building.
Here's a couple of pics. The first shows the empty trenches that were dug by August 19, and the second shows the trenches backfilled and the height of the pipes when they reach the dry well.


Exterior Accessibility
Once the pipes were installed, the roofers returned to install new gutters and downspouts. We now have two downspouts instead of just one at the rear of the building and the gutter has been pitched correctly so the water won't run towards the building anymore (that's a bad thing!). The gutters still need to be painted however.
Next up comes relaying the brick walk our back. But we want to create a ramp up towards the back door so that the museum will be more accessible. As I write this today, the masons are just finishing up the new walkway. Here's a few pics of what the walk looked like as of Wednesday:


At the point where the brick reaches the door, our carpenters will fashion a ramped threshhold out of mahogany or cypress to make the transition up into the museum shop area. The masons are currently working on the transition from this ramp to the patio out of frame (to the left of the bottom picture).
Interior Accessibility
Inside the building we had to make some minor modifications as well in order to allow someone that uses a wheelchair to make their way throughout the whole first floor of the building.
We added a small threshold in the doorway from the museum shop into the kitchen hallway. It is made out of salvaged antique pine and should eventually darken to match the historic flooring in the hallway. Here's a pic:

Once in the hallway, a ramp is needed to get up into the second parlor or dining room of the house. That ramp was also built from salvaged antique pine. One task still left to do is to round over the edge of the ramp where it meets the floor. Because we installed the boards parallel to the existing floorboards it's possible that someone could chip the end grain if they kick it or drag their feet.

Finally, we also had to widen the doorway into the second parlor to achieve a width of at least 32" to allow a wheelchair to manuever through the doorway. This did not require us to alter any historic fabric. The doorway had been framed in the 1970s so we just widened that 1970s era framing. Since we widened the door, a new piece of molding had to be milled for the top of the doorway to match the existing molding on the sides. The door was removed completely, tagged as to its location in the second parlor, and placed in storage. Here's what the doorway looks like now:

This doorway has been a controversial architectural feature for some time now - we weren't sure if it was original or not. When we removed the 1970s doorway framing we had a good look at the construction of the doorway. I'll describe our findings in a future post!
Today, carpenters and masons from our general contractor arrived on site to continue our projects at the Amstel House.
The carpenters will be applying painted trim boards at the top of the rake boards at the gable end of the the Amstel kitchen wing and the south side of the Dutch House. The trim board is simply a 1" x 2" that will be fit directly beneath the edge of the new roofing shingles to cover the gap that is created by our layered roofing system (about 1/2"). While the trim board is not an historically accurate element of either house, it is completely reversible and will protect the roof sheathing while giving a finished appearance to the rakes. It allows us to install a roofing system that has a Class A fire rating instead of a Class B. So we are willing to add the new element for the overall protection of the structures.
The masons are here to develop a materials list for their accessibility and drainage project at the rear of the Amstel House. They will begin removing bricks from the walkway at the rear door of the building (the museum shop door). they will be pulling all the bricks up individually and mapping the individual location of every brick so that when they put the walk back down, the bricks will be in exactly the same configuration that they are currently in.
Between taking the bricks up and putting them back, they will install underground drainage pipes to carry roof water from the downspouts to the new dry well in the center of the yard. Then they will regrade the area to create a gentle slope up to the rear door that will meet ADA requirements and allow people that use wheelchairs easy access to the museum.
Speaking of digging holes and walkways....
I need to provide an update about what the archaeologists found. The big finds were a few post holes that might indicate the location of a fence in the back yard, and a brick walk that was discovered about 18 inches below grade where we are going to be placing one of our drain pipes. The post holes could be 18th century - we're not sure of the age of the brick walk - though earlier surfaces were discovered in the trench at deeper levels. Here's a pic of the archaeologists uncovering the buried walkway:
 Tomorrow I'll post pics of the completed trim boards on the rakes.


