skip to main |
skip to sidebar
On Friday the roofers completed work on the garden house at both the Amstel & Dutch Houses. There are a couple of items that need to be addressed on the new roofs, and they are returning tomorrow to take care of them:
1) On the Amstel Garden House, they used some shingles that are wider than 9.5". We are concerned that they may split as the shingle expands and contracts. If a split occurs below the joint in a course above or below it, it's possible that it may leak.
2) On the same building, they allowed joints between shingles to repeat after just two courses instead of three - which is preferred for wood roofs.
3) On the Dutch House garden house, which has a hip roof, they did not match the overlap detail at the ridges on the hips. the shingles should overlap in an alternating pattern. Instead they mitered them and butted them against each other allowing two joints directly above each other - another possibility for leaking.
4) The shingles are uneven where they meet at the northwest ridge.
5) A few shingles split or were not wide enough to complete the miter joint at the ridges.
Here's a pic of one of the hips that needs to be addressed:

In chimney & fireplace news...
On Friday we met with our mason, architect and general contractor to discuss how to proceed with the fireplace and chimney restoration. We discussed plans to keep the fireplace in its original configuration with as little restoration as possible. I think we'll be keeping the original plaster in place and will not use new plaster to fill in areas of missing plaster. We'll also rebuild the chimney as it was originally - voids and all. Finally, we will rebuild the squirrel-tail bake oven some time in the future - under a different project (time to write some grant apps!).
We also talked about ways to make bricks for the hearth ourselves. We'll be digging a big hole in the Amstel House yard about mid-June for a dry-well. We're keeping our fingers crossed that the hole will yield some good clay that can be used to make bricks. Our mason suggested getting our members and the public involved in a brick-making workshop. Then we may explore having our handmade bricks fired at Colonial Williamsburg or - in the ultimate historic brick-making fantasy - build our own kiln here in town and do them ourselves in an authentic 18th century manner. Since the brick-making process will take some time, we'll keep the existing hearth as is and fill in around it with additional bricks temporarily. Sounds like a cool project in whatever guise it eventually takes!
Today, I went brick-picking and brought back 89 more historic bricks - that brings our salvaged total to 389! Unfortunately, my brick picking skills leave a little to be desired so the masons may reject alot of what I've recovered so far (I'm hoping for only a 30% reject rate - we'll see!).
I also set up a display in the kitchen to show how bricks are molded and differences in bricks used for paving hearths. Here's a pic:

I think that's about it for today. I let you know how the roof goes tomorrow (hopefully it won't rain).
So now that we have a bunch of questions, it's time to start looking for some answers. Yesterday, I began digging through some of our own archives here at the Historical Society, and found some photos and descriptions that help clarify things a bit...In a 1938 address to the Garden Club of Wilmington, Mrs. Caleb Layton describes the reconstruction of the bake oven at the Amstel House (below). Based on her chronology leading up to the following excerpt, it sound like the bake oven was reconstructed just prior to May 1938."Originally Amstel House had a Dutch oven which extended from the kitchen wall into a space paved with cobbles. We decided to attempt to reconstruct the oven while the expert bricklayer was at hand sent by Mr. [Charles] Gillette from Williamsburg. The oven is not very large, but it has one feature that is not often found. Instead of an iron dorr [sic], it has a small brick shelf upon which a heavy oak cover is supported. The opening is not into the room, but over the hearth, inside the chimney breast itself, the space for the fire being slightly to the left. There is no connection between the oven and the chimney, and no chute for ashes. Apparently embers were taken from the fire and banked in the oven. Later when the oven was hot, they were raked back, and the heat was kept in by the thickness of the plank cover. Since Mr. Gillette was not accustomed to ovens [Gillette was a landscape architect from Richmond, VA.], we took the findings to Mr. [Erling] Pederson, who is the expert in charge of restoration for the Pennsylvania Museum [Philadelphia Museum of Art]. He made a sketch with proper dimensions for oven and dome, and thus the oven was restored."Bake oven just after reconstruction, c. 1938:
 This above passage confirmed for us the date of the reconstructed bake oven - about 1938. From Mrs. Layton's description it sounds as if the reconstruction was a relatively unplanned decision, but in fact Gillette's landscape plans from 1932, 6 years earlier, show the bake oven in its current location. Another thing Mr. Layton's decription tells us is that the 1930s restorers did not know that the squirrel tail flue existed ("There is no connection between the oven and the chimney..."). This is confirmed in the reminiscences of Bruce Gordon, a local contractor that worked on the Amstel House frequently between 1932 and 1968. Gordon remembers that he "opened the fireplace also. Fireplace appeared sound but wasn't opened all the was because of possible draft. Found beehive oven but did not work on it." So Gordon states that the earlier restorers did not go as far as we have by removing masonry added after the fireplace's original contruction date. They left the squirrel tail flue covered by masonry added at some earlier time. Gordon also mentions that a "timber was taken from barn at 6th and New Castle [does he mean Delaware St?] for mantel (1930)." This confirms for us that the roughly hewn timber that was spiked to the lintel was definitely added during the 1930s restoration process. It reflects the colonial revival ideal of what a colonial kitchen fireplace should look like, i.e. pewter plates on the mantel and musket on the wall above.Gordon's memories of working on the house also tell us that the fireplace was closed in prior to the 1930s and that the opening was narrowed at some earlier date. It also indicates that they were aware that enlarging the opening might throw off the ratio between flue size and opening size and result in problems with the fireplace drafting correctly. My guess is that the chimney had already been reconstructed from the roof up. The reconstructed chimney, as noted in an earlier post, included a kitchen flue that was reduced from its 18th century size.The chimney was probably reconstructed in 1905, when the owner of the Amstel House, Henry Hanby Hay, was making other alterations to the house. At that time, he added a second floor alcove that projected out of the back of the house next to the chimney. Probably at that time, the gable of the house was substantially rebuilt. When we opened the attic to gain access to the chimney for this project, we discovered that the inside of the gable wall was made of concrete block (with a brick veneer on the outside). This alcove was removed in the 1990s due to structural problems (see below):
 As I'm writing this I realize that another thing that we discovered when we opened the attic is that the roof rafters are sawn timbers rather than hewn timbers. The beams in the attic floor, however are all hewn as expected. Was the roof rebuilt in 1905? Or sometime earlier? I'm supposed to be finding answers not developing more questions!More on what kind of information the archives are producing tomorrow.
The last two days of the week, the masons spent their time dismantling the chimney to below roof level. They discovered that the interior of the chimney (the flue) was lined with clinker bricks. Clinker bricks are bricks that did not fire correctly in the kiln. They are often harder than normal bricks and often distorted in shape. Hence, their use inside the chimney where they would never be seen. Interestingly, clinkers became popular around the beginning of the 20th century when the Arts & Crafts movement was popular (Click here for an article on clinkers). They also noted that the mortar used between these bricks seems to be clay and sand. There doesn't appear to be any pieces of lime in the mortar. Needless to say, it's turning to dust.
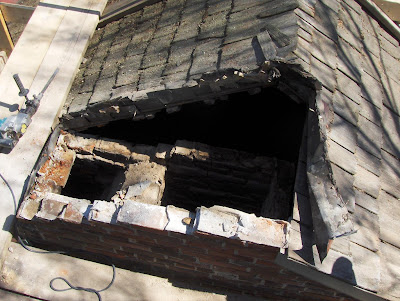
 Another discovery was the that the chimney contains a void between the kitchen flue and the flue for the corner fireplace on the second floor. This took our masons by surprise since most chimneys are solid throughout except where the flues are. Why did the original builders leave the chimneys essentially hollow inside? Was it to save material and labor costs? Or could it be a regional method of construction? I'm not sure. When taken in conjunction with the random masonry pattern (half bricks, header courses on top of header courses) used on the walls of the kitchen wing itself - which defies categorization into any of the well-known brick bond patterns - I'm beginning to think that the builder was pinching pennies (not a fact, just a theory). The masons also discovered that during a previous rebuild of the chimney, the flue at the very top of the chimney was reduced in size (to the same size as the 2nd floor fireplace). Did this cause the fireplace to smoke or was this done at the same time the fireplace was reduced in size so did not result in a smoking issue? I need to dig through some of our archival material to look for details about the restoration work that was done in the early 20th century. Here's a photo taken after the 20th century chimney was dismantled showing the original size of the two flues (the kitchen flue is on the right):
 Finally, they examined the 2nd floor fireplace and its construction is essentially the same (in smaller scale) as the kitchen fireplace below it. It was also plastered and the plaster is intact. A new firebox with firebrick was built in front of the original firebox when a damper was added, sometime in the 20th century perhaps. The masons asked about removing the modern firebrick to expose the original firebox. Since this bedchamber is not interpreted to the public (it's actually used for our office), I doubt that we will remove the firebrick at this time. We'll probably save that for a future project. While the masons worked on the chimney, I sifted through piles of old brick looking for suitable bricks that might be used in our project. I spent about 3 hours looking for bricks. Here are some of my finds:
  We also examined the hearths of the other fireplace in the house. We discovered that two bedroom fireplaces and the fireplace in the best parlor use two courses of 6" x 6" square hearth bricks at the front of the hearth and the typical rectangular bricks toward the back of the hearth. This use of square pavers elsewhere in the house and the fragment we found in the kitchen fireplace lend support to a decision to use 6" x 6" bricks for the kitchen hearth. Now to figure out where to get them...The masons probably won't be back until Friday to give us some time to try to answer some questions and decide how to proceed with the restoration. I'm hoping this week we can open the house in the evening to invite New Castle Historical Society members in to view the hearth in its raw, un-restored state. More on that later this week.
Our first major project at the Amstel House is the restoration of the kitchen fireplace, hearth, and chimney. We are restoring the fireplace to its original size and configuration, c. 1738. The project is expected to take about 5 weeks to complete.
On-site work began last week. Carpenters arrived Thursday to cut an access hatch in the ceiling of a second floor bedchamber (our current office) so the masons can get into the attic above to work on the chimney. Conveniently there was an obvious area in the corner of the ceiling that was patched with plaster, and the plaster had cracked in a right-angle pattern suggesting a previous access hatch. We hoped if we opened the same area that we would see evidence in the framing of an original hatch. So, with fingers crossed the carpenters opened the hatch...
...and found no framing - darn! It was apparent that someone had previously cut through the ceiling in that area since the original lath was cut back below a large timber, and the lath used in the patch was sawn rather than hand-split.
After consulting with our architect we decided to move ahead with our original plans to finish the opening permanently with a jamb, trim and panel so we will always have easy access into the attic for storage, maintenance and to trap the occasional squirrel or raccoon (if you live in New Castle you understand this!). We'll finish the plaster around it and paint it after the chimney is finished. Here a detail shot of the trim and door:  On Monday the masons arrived for their first full day on work. Scaffolding was set up at the rear of the kitchen wing, taking a good portion of the day. The investigated the chimney as well as the condition of the other two chimneys and took some very valuable photos of the other chimney, flues, and roofs. As you might guess the photos reveal that additional work is needed (ugh!). But more on that later...Toward the end of the day the began deconstruction of the kitchen chimney.
  Meanwhile, I spent about two hours trying to pick appropriate bricks out of a huge pile of (mostly) 18th century bricks from a nearby house that was torn down (the owner was gracious enough to donate bricks for our project). For a novice like me, picking appropriate bricks is tougher that I thought. When I brought my first cache of bricks back to our site, the masons reviewed them and gave me some additional insight into picking good bricks. So when the weather clears up I'll go back to try again.
That pretty much wraps up the first couple of days from my perspective!
Welcome to the New Castle Historical Society's new historic preservation blog! I'll be using this blog to keep you up-to-date with preservation activities, issues, and projects happening in and around Historic New Castle, Delaware.
The idea for a blog developed last year as the New Castle Historical Society (NCHS) planned some major preservation projects on our historic properties - the Amstel House & the Dutch House. The posts on our original blog (on www.newcastlehistory.org) slowed down due to some delays in getting our projects started. Now that we are underway, I will use this blog to keep you informed about progress on our projects, our decision making process, treatment options and choices that we make. I hope you will find information that is useful in your own preservation projects.


